大家好,这里是 Lucifer三思而后行,专注于提升数据库运维效率。
前言
本章目标:掌握本章核心知识点
前置要求:完成前序章节学习
预计时长:60 分钟
Apache IoTDB 一款国产开源数据库,是针对时间序列数据收集、存储与分析一体化的数据管理引擎。它具有体量轻、性能高、易使用的特点,完美对接 Hadoop 与 Spark 生态,适用于工业物联网应用中海量时间序列数据高速写入和复杂分析查询的需求。
在安装部署方面,IoTDB 的理念就是系统运维要简单,要一键启动、开箱即用。所以 IoTDB 具有灵活的部署方式:
- 云端一键部署
- 终端解压即用
- 终端-云端无缝连接(数据云端同步工具)
参考文档:
本文主要讲解单机版的安装部署,关于集群安装部署由于篇幅问题,放到下一篇进行介绍。
部署选型
Apache IoTDB 提供了两种主要部署模式:
单机部署:适合轻量级系统,性能最高,一致性最高,由 1C1D 构成,开箱即用。集群部署:适合对于扩展性和高可用有一定需求的系统,可以选择 aCbD 的部署方式。
术语缩写:
C:ConfigNodeD:DataNodeaCbD:a 个 ConfigNode 和 b 个 DataNode
在集群部署模式下,IoTDB 支持自动故障转移,确保系统在节点故障时能够快速切换到备用节点。切换时间可以达到秒级,从而最大限度地减少系统中断时间,且可保证切换后数据不丢失。当故障节点恢复正常,系统会自动将其重新纳入集群,确保集群的高可用性和可伸缩性。
IoTDB 还支持读写分离模式部署,可以将读操作和写操作分别分配给不同的节点,从而实现负载均衡和提高系统的并发处理能力。
对于 IOTDB 的部署模式选型,可以参考官方文档:IoTDB 部署推荐。
选择模式
IoTDB 包含以下 4 种部署模式,根据系统能力进行划分:
| 模式 | 性能 | 扩展性 | 高可用 | 一致性 |
|---|
| 轻量单机模式 | 最高 | 无 | 无 | 高 |
| 可扩展单节点模式 (默认) | 高 | 高 | 中 | 高 |
| 高性能分布式模式 | 高 | 高 | 高 | 中 |
| 强一致分布式模式 | 中 | 高 | 高 | 高 |
系统能力:
性能需求:系统读写速度,压缩比扩展性:系统能够用多节点管理数据,本质上是数据是否可分区管理高可用:系统能够容忍节点失效,本质上是数据是否有副本一致性:当数据有多副本时,不同副本是否一致,本质上用户是否能将数据库当做单机看待
配置介绍
在确定部署模式之后,参照下方的表格可以看到对于配置的一些需求和建议:
| 配置 | 轻量单机模式 | 可扩展单节点模式 | 高性能分布式模式 | 强一致分布式模式 |
|---|
| ConfigNode 个数 | 1 | ≥1 (奇数) | ≥1 (奇数) | ≥1(奇数) |
| DataNode 个数 | 1 | ≥1 | ≥3 | ≥3 |
| 元数据副本 schema_replication_factor | 1 | 1 | 3 | 3 |
| 数据副本 data_replication_factor | 1 | 1 | 2 | 3 |
| ConfigNode 协议 config_node_consensus_protocol_class | Simple | Ratis | Ratis | Ratis |
| SchemaRegion 协议 schema_region_consensus_protocol_class | Simple | Ratis | Ratis | Ratis |
| DataRegion 协议 data_region_consensus_protocol_class | Simple | IoT | IoT | Ratis |
通过以上一系列的选型之后,你的系统大概需要什么样的部署模式以及配置基本就可以确定了,接下来就是安装部署了。
安装包下载
Apache IoTDB 下载链接 🔗:https://iotdb.apache.org/zh/Download/ :
建议选择最新发行版,这里我下载 All-in-one 包,解压后即可使用,开箱即用!
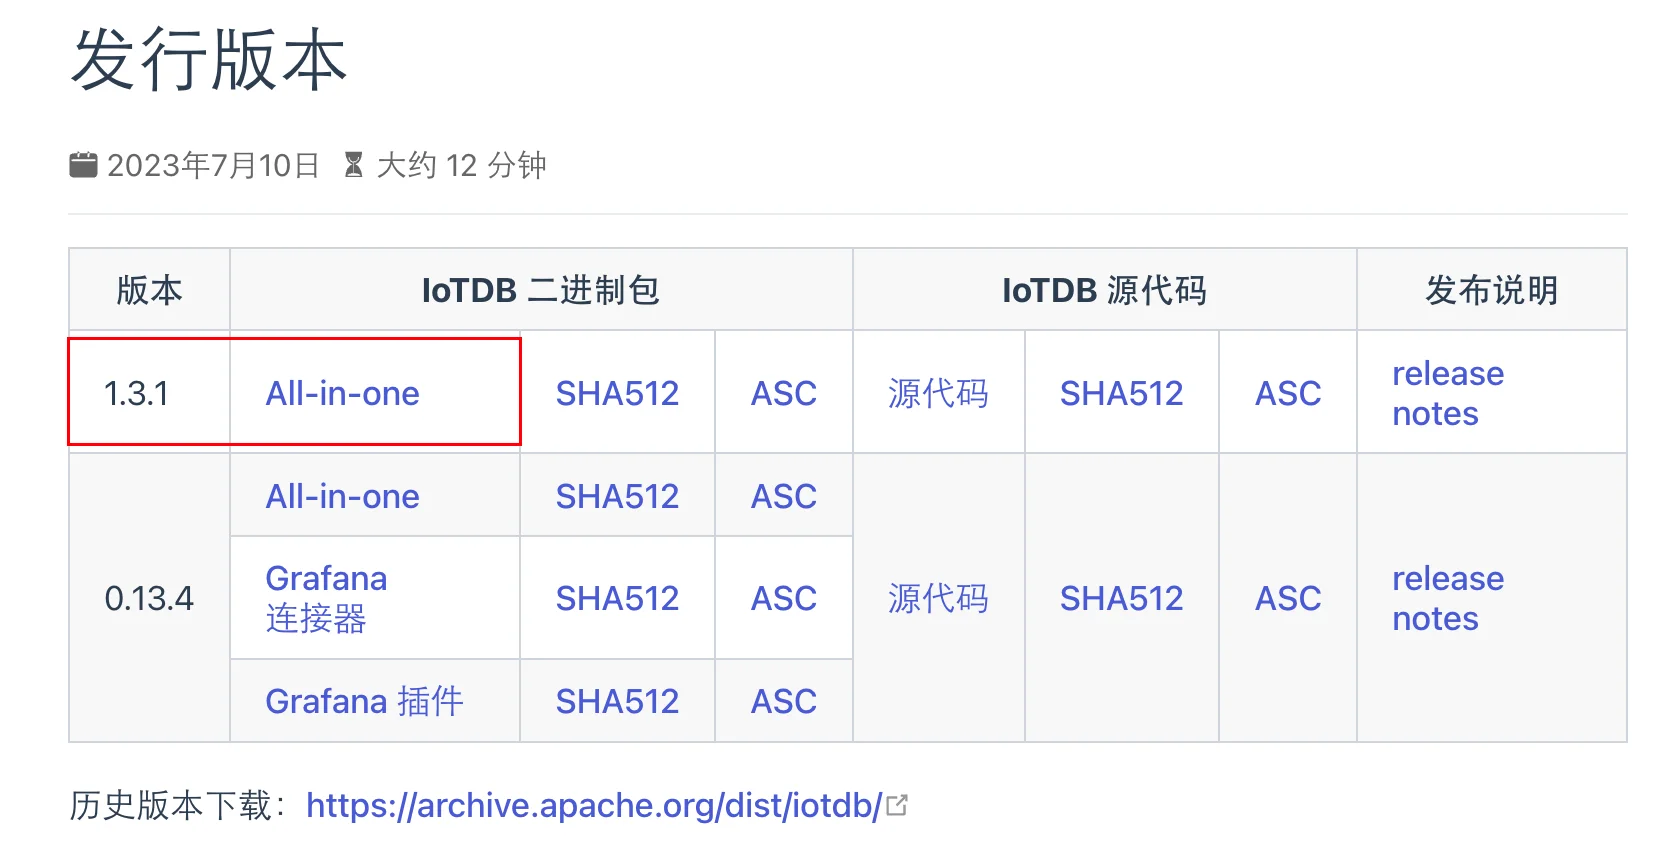
如果需要历史版本的话可以选择历史版本下载。
安装部署
IoTDB 支持多种安装途径。用户可以使用以下三种方式对 IoTDB 进行安装:
- 二进制可运行程序:从 下载 页面下载最新的安装包,解压后即完成安装。
- 使用源码:可以从代码仓库下载源码并编译,感兴趣的朋友也可以尝试源代码安装。
- 使用 Docker 镜像:dockerfile 文件位于 Github。
IoTDB 安装部署比较简单,需要满足以下要求:
- 安装前需要保证设备上配有
JDK>=1.8 的运行环境,并配置好 JAVA_HOME 环境变量。
- 设置最大文件打开数为
65535。
Java 下载地址:所有操作系统的 Java 下载
笔者的电脑是 Mac,所以首先演示 MacOS 安装 IoTDB,会比较详细一些。
MacOS 安装
检查 JAVA 环境
首先需要检查 JAVA 环境是否满足条件(MacOS 安装 Java 比较简单,双击安装即可):
1## 查看安装好的 JAVA 版本
2╭─lucifer@Lucifer ~
3╰─$ java -version
4java version "1.8.0_411"
5Java(TM) SE Runtime Environment (build 1.8.0_411-b09)
6Java HotSpot(TM) 64-Bit Server VM (build 25.411-b09, mixed mode)
7
8## MacOS 查看默认安装 JAVA_HOME
9╭─lucifer@Lucifer ~
10╰─$ /usr/libexec/java_home
11/Library/Internet Plug-Ins/JavaAppletPlugin.plugin/Contents/Home
12
13## 设置 JAVA_HOME
14╭─lucifer@Lucifer ~
15╰─$ cat<<-\EOF>>~/.zshrc
16export JAVA_HOME=$(/usr/libexec/java_home)
17EOF
18
19## 生效环境变量
20╭─lucifer@Lucifer ~
21╰─$ source ~/.zshrc
22
23## 查看 JAVA_HOME
24╭─lucifer@Lucifer-7 ~
25╰─$ echo $JAVA_HOME
26/Library/Internet Plug-Ins/JavaAppletPlugin.plugin/Contents/Home
解压安装
解压安装包:
1╭─lucifer@Lucifer ~/Downloads
2╰─$ ll -lrth apache-iotdb-1.3.1-all-bin.zip
3-rwxr-xr-x@ 1 lucifer staff 91M 5 26 17:54 apache-iotdb-1.3.1-all-bin.zip
4╭─lucifer@Lucifer ~/Downloads
5╰─$ unzip -q apache-iotdb-1.3.1-all-bin.zip -d /Volumes/DBA/IoTDB
6╭─lucifer@Lucifer ~/Downloads
7╰─$ cd /Volumes/DBA/IoTDB
8╭─lucifer@Lucifer /Volumes/DBA/IoTDB
9╰─$ cd apache-iotdb-1.3.1-all-bin
10╭─lucifer@Lucifer /Volumes/DBA/IoTDB/apache-iotdb-1.3.1-all-bin
11╰─$ tree -d -L 1
12
13.
14├── conf
15├── lib
16├── licenses
17├── sbin
18└── tools
19
206 directories
软件目录结构
- sbin 启动和停止脚本目录
- conf 配置文件目录
- tools 系统工具目录
- lib 依赖包目录
启动 IoTDB 数据库
IoTDB 是一个基于分布式系统的数据库。要启动 IoTDB ,可以先启动单机版(一个 ConfigNode 和一个 DataNode)来检查安装。
用户可以使用 sbin 文件夹下的 start-standalone 脚本启动 IoTDB:
1## 进入 sbin 目录
2╭─lucifer@Lucifer /Volumes/DBA/IoTDB/apache-iotdb-1.3.1-all-bin
3╰─$ cd sbin
4
5## 查看目录下有哪些内容
6╭─lucifer@Lucifer /Volumes/DBA/IoTDB/apache-iotdb-1.3.1-all-bin/sbin
7╰─$ ls
8daemon-confignode.sh destroy-confignode.sh remove-confignode.sh start-cli.sh start-standalone.bat stop-datanode.bat
9daemon-datanode.sh destroy-datanode.bat remove-datanode.bat start-confignode.bat start-standalone.sh stop-datanode.sh
10destroy-all.bat destroy-datanode.sh remove-datanode.sh start-confignode.sh stop-all.sh stop-standalone.bat
11destroy-all.sh iotdb-common.sh start-all.sh start-datanode.bat stop-confignode.bat stop-standalone.sh
12destroy-confignode.bat remove-confignode.bat start-cli.bat start-datanode.sh stop-confignode.sh
13
14## start-standalone 命令可以同时启动 ConfigNode 和 DataNode,就是这么简单快捷
15╭─lucifer@Lucifer /Volumes/DBA/IoTDB/apache-iotdb-1.3.1-all-bin/sbin
16╰─$ ./start-standalone.sh
17Execute start-standalone.sh finished, you can see more details in the logs of confignode and datanode
连接 IoTDB 数据库
启动后使用 start-cli.sh 来连接 IoTDB,这是一个客户端连接程序:
1╭─lucifer@Lucifer /Volumes/DBA/IoTDB/apache-iotdb-1.3.1-all-bin/sbin
2╰─$ ./start-cli.sh --help 130 ↵
3Usage: ./start-cli.sh [-h <ip>] [-p <port>] [-u <username>] [-pw <password>] [-D <name=value>] [-c] [-e sql]
1、直接执行 start-cli.sh 连接本机数据库:
1## 默认连接本机 127.0.0.1,默认端口号是 6667,数据库开启时默认会创建一个 root 用户,对应密码为 root
2╭─lucifer@Lucifer /Volumes/DBA/IoTDB/apache-iotdb-1.3.1-all-bin/sbin
3╰─$ ./start-cli.sh 1 ↵
4---------------------
5Starting IoTDB Cli
6---------------------
7 _____ _________ ______ ______
8|_ _| | _ _ ||_ _ `.|_ _ \
9 | | .--.|_/ | | \_| | | `. \ | |_) |
10 | | / .'`\ \ | | | | | | | __'.
11 _| |_| \__. | _| |_ _| |_.' /_| |__) |
12|_____|'.__.' |_____| |______.'|_______/ version 1.3.1 (Build: 214695d)
13
14
15Successfully login at 127.0.0.1:6667
16## 这里因为是新建的数据库,所以没有数据,是正常的
17IoTDB> show timeseries
18+----------+-----+--------+--------+--------+-----------+----+----------+--------+------------------+--------+
19|Timeseries|Alias|Database|DataType|Encoding|Compression|Tags|Attributes|Deadband|DeadbandParameters|ViewType|
20+----------+-----+--------+--------+--------+-----------+----+----------+--------+------------------+--------+
21+----------+-----+--------+--------+--------+-----------+----+----------+--------+------------------+--------+
22Empty set.
23It costs 0.224s
2、指定详细信息的方式连接:
1╭─lucifer@Lucifer /Volumes/DBA/IoTDB/apache-iotdb-1.3.1-all-bin/sbin
2╰─$ ./start-cli.sh -h 127.0.0.1 -p 6667 -u root -pw root
3---------------------
4Starting IoTDB Cli
5---------------------
6 _____ _________ ______ ______
7|_ _| | _ _ ||_ _ `.|_ _ \
8 | | .--.|_/ | | \_| | | `. \ | |_) |
9 | | / .'`\ \ | | | | | | | __'.
10 _| |_| \__. | _| |_ _| |_.' /_| |__) |
11|_____|'.__.' |_____| |______.'|_______/ version 1.3.1 (Build: 214695d)
12
13
14Successfully login at 127.0.0.1:6667
15IoTDB> show timeseries
16+----------+-----+--------+--------+--------+-----------+----+----------+--------+------------------+--------+
17|Timeseries|Alias|Database|DataType|Encoding|Compression|Tags|Attributes|Deadband|DeadbandParameters|ViewType|
18+----------+-----+--------+--------+--------+-----------+----+----------+--------+------------------+--------+
19+----------+-----+--------+--------+--------+-----------+----+----------+--------+------------------+--------+
20Empty set.
21It costs 0.030s
3、指定数据库主机 IP 连接,通常适用于客户端和数据库端不在一个主机上时连接:
1╭─lucifer@Lucifer /Volumes/DBA/IoTDB/apache-iotdb-1.3.1-all-bin/sbin
2╰─$ ./start-cli.sh -h 192.168.31.24 -p 6667 -u root -pw root
3---------------------
4Starting IoTDB Cli
5---------------------
6 _____ _________ ______ ______
7|_ _| | _ _ ||_ _ `.|_ _ \
8 | | .--.|_/ | | \_| | | `. \ | |_) |
9 | | / .'`\ \ | | | | | | | __'.
10 _| |_| \__. | _| |_ _| |_.' /_| |__) |
11|_____|'.__.' |_____| |______.'|_______/ version 1.3.1 (Build: 214695d)
12
13
14Successfully login at 192.168.31.24:6667
15IoTDB> show timeseries
16+----------+-----+--------+--------+--------+-----------+----+----------+--------+------------------+--------+
17|Timeseries|Alias|Database|DataType|Encoding|Compression|Tags|Attributes|Deadband|DeadbandParameters|ViewType|
18+----------+-----+--------+--------+--------+-----------+----+----------+--------+------------------+--------+
19+----------+-----+--------+--------+--------+-----------+----+----------+--------+------------------+--------+
20Empty set.
21It costs 0.030s
关闭 IoTDB 数据库
1╭─lucifer@Lucifer-7 /Volumes/DBA/IoTDB/apache-iotdb-1.3.1-all-bin/sbin
2╰─$ ./stop-standalone.sh
3Check whether the internal_port is used..., port is 10710
4Stop ConfigNode, PID: 82045
5Check whether the rpc_port is used..., port is 6667
6Stop DataNode, PID: 82096
配置快捷命令
这里分享一个小技巧,避免每次使用都需要进入到 sbin 目录下执行命令:
1╭─lucifer@Lucifer-7 ~
2╰─$ cat<<-\EOF>>~/.zshrc
3export IoTDB_HOME=/Volumes/DBA/IoTDB/apache-iotdb-1.3.1-all-bin
4alias IoTDB_start='$IoTDB_HOME/sbin/start-standalone.sh'
5alias IoTDB_stop='$IoTDB_HOME/sbin/stop-standalone.sh'
6alias IoTDB_cli='$IoTDB_HOME/sbin/start-cli.sh'
7EOF
8╭─lucifer@Lucifer-7 ~
9╰─$ source ~/.zshrc
使用快捷命令:
1╭─lucifer@Lucifer-7 ~
2╰─$ IoTDB_start
3Execute start-standalone.sh finished, you can see more details in the logs of confignode and datanode
4╭─lucifer@Lucifer-7 ~
5╰─$ IoTDB_cli
6---------------------
7Starting IoTDB Cli
8---------------------
9 _____ _________ ______ ______
10|_ _| | _ _ ||_ _ `.|_ _ \
11 | | .--.|_/ | | \_| | | `. \ | |_) |
12 | | / .'`\ \ | | | | | | | __'.
13 _| |_| \__. | _| |_ _| |_.' /_| |__) |
14|_____|'.__.' |_____| |______.'|_______/ version 1.3.1 (Build: 214695d)
15
16
17Successfully login at 127.0.0.1:6667
18IoTDB> show timeseries
19+----------+-----+--------+--------+--------+-----------+----+----------+--------+------------------+--------+
20|Timeseries|Alias|Database|DataType|Encoding|Compression|Tags|Attributes|Deadband|DeadbandParameters|ViewType|
21+----------+-----+--------+--------+--------+-----------+----+----------+--------+------------------+--------+
22+----------+-----+--------+--------+--------+-----------+----+----------+--------+------------------+--------+
23Empty set.
24It costs 0.181s
25IoTDB> exit
26╭─lucifer@Lucifer-7 ~
27╰─$ IoTDB_stop
28Check whether the internal_port is used..., port is 10710
29Stop ConfigNode, PID: 90400
30Check whether the rpc_port is used..., port is 6667
31Stop DataNode, PID: 90449
单机模式比较简单,到这里安装就结束了。
Windows 安装
Windows 也是一样,安装配置好 JAVA 后解压文件夹即可。
检查 JAVA 环境
查看 JAVA 是否满足:
1## 查看 java 版本
2C:\Users\RemoteVM>java -version
3java version "1.8.0_411"
4Java(TM) SE Runtime Environment (build 1.8.0_411-b09)
5Java HotSpot(TM) 64-Bit Server VM (build 25.411-b09, mixed mode)
6
7## 查看 JAVA_HOME 环境变量
8C:\Users\RemoteVM>echo %JAVA_HOME%
9C:\Program Files\Java\jre-1.8
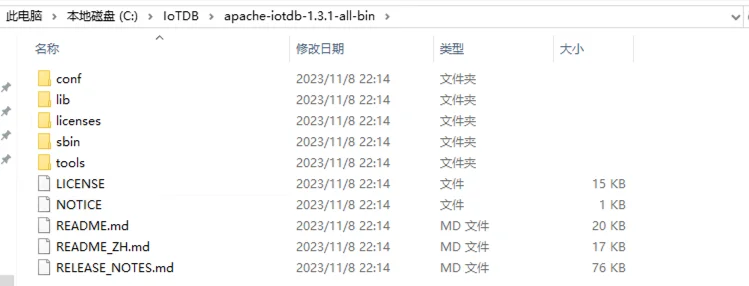
解压安装
解压安装:

启动 IoTDB 数据库
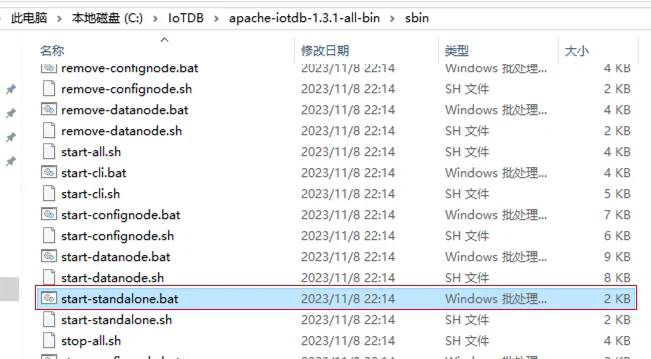
进入 sbin 目录双击 start-standalone.bat 打开 IoTDB 数据库:
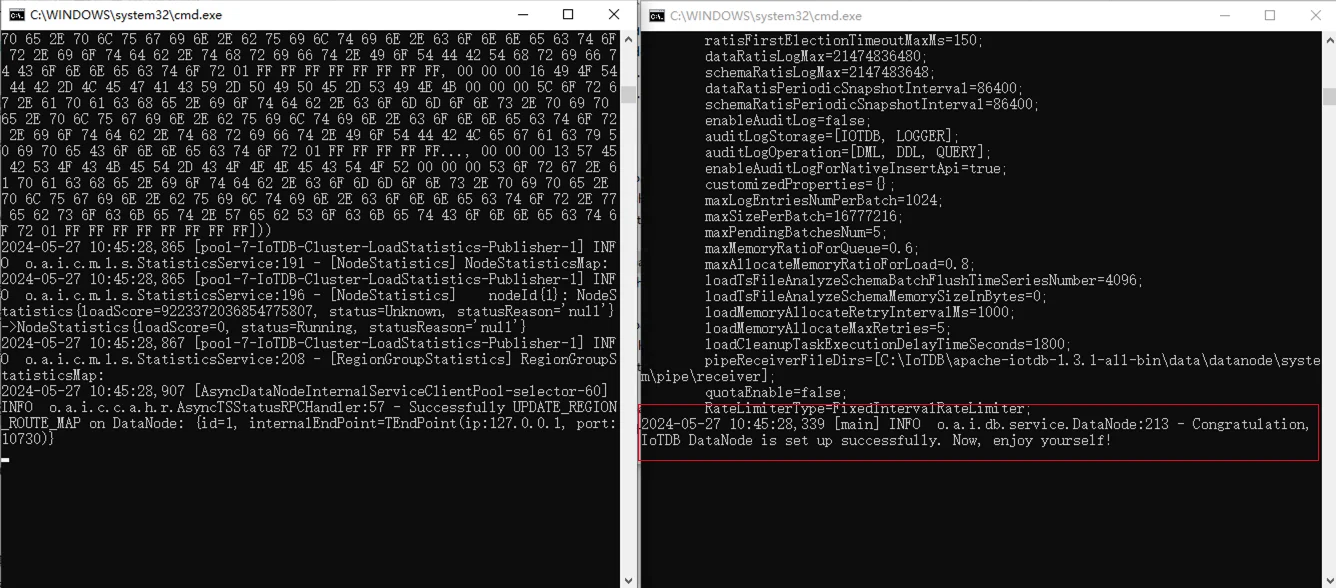
会打开两个窗口,当提示 Congratulation, IoTDB DataNode is set up successfully. Now, enjoy yourself! 即打开 IoTDB 成功:
连接 IoTDB 数据库
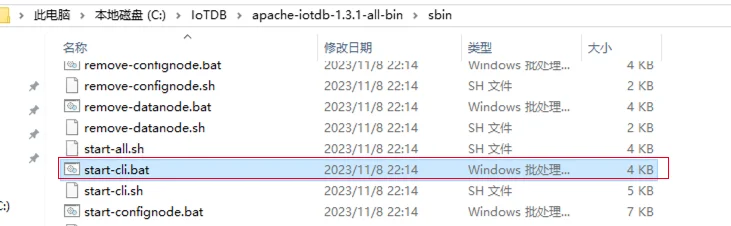
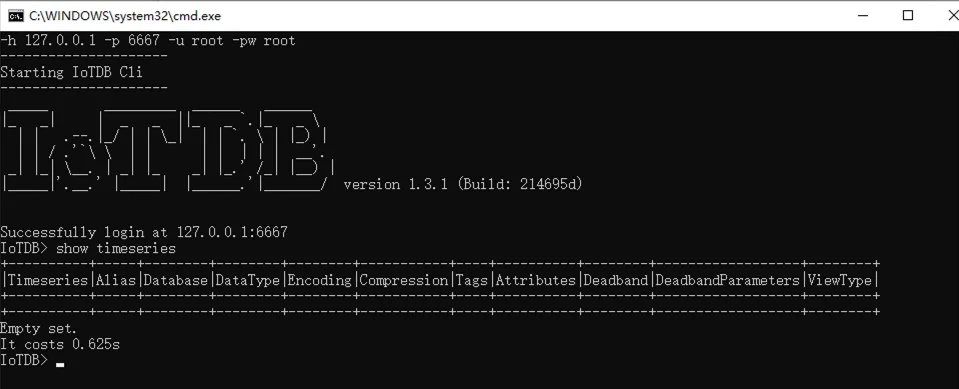
关闭 IoTDB 数据库
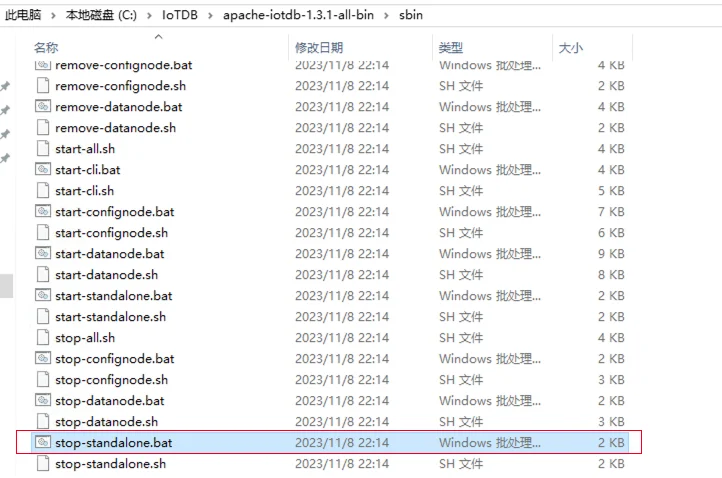
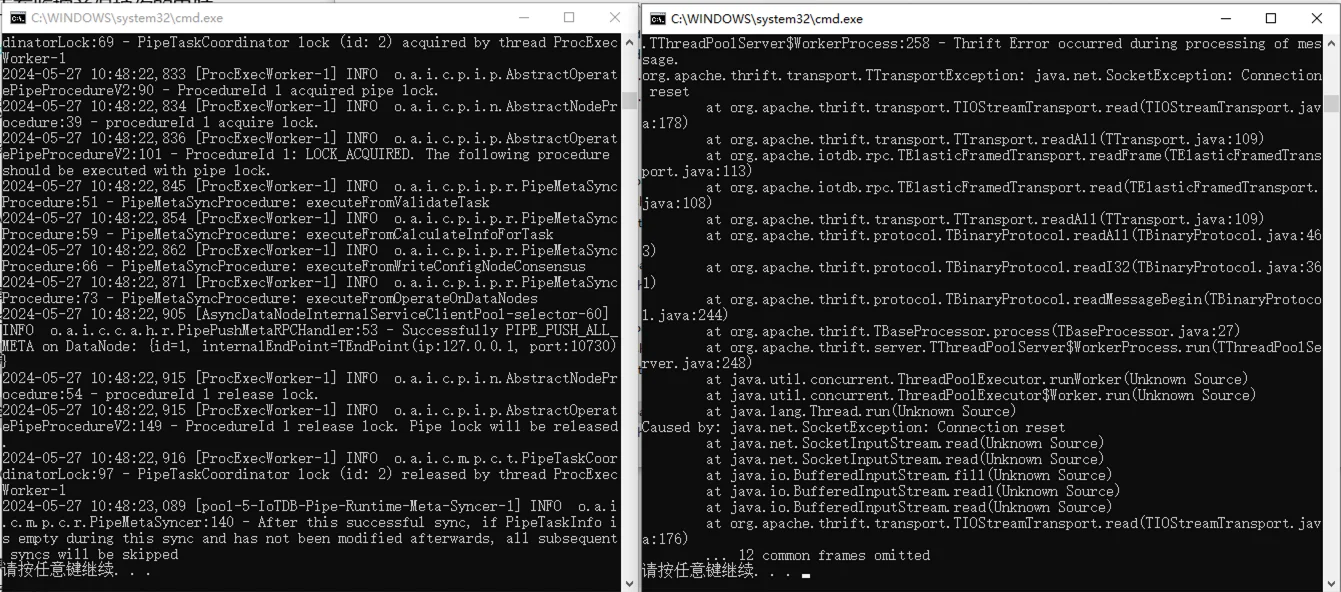
执行关闭后,两个窗口提示按任意键退出,回车退出即可:
配置快捷命令
Windows 没有 alias 命令,所以使用环境变量的方式来简化:
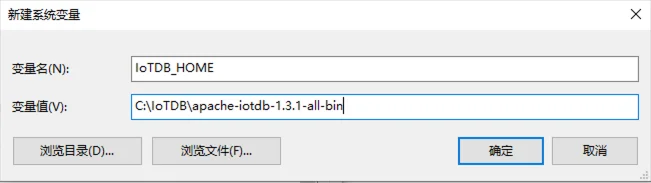
1## 进入 IoTDB sbin 目录
2C:\Users\RemoteVM>cd %IoTDB_HOME%\sbin
3
4## 开启 IoTDB
5C:\IoTDB\apache-iotdb-1.3.1-all-bin\sbin>start-standalone.bat
6
7## 连接 IoTDB
8C:\IoTDB\apache-iotdb-1.3.1-all-bin\sbin>start-cli.bat
9
10## 关闭 IoTDB
11C:\IoTDB\apache-iotdb-1.3.1-all-bin\sbin>stop-standalone.bat
Windows 的安装部署使用介绍到这结束,接下来讲讲 Linux 的安装部署。
Linux 安装
安装好 Linux 操作系统后,创建 /soft 目录,上传所需安装介质:
1[root@IoTDB01 ~]# mkdir /soft
2[root@IoTDB01 ~]# cd /soft/
3[root@IoTDB01 soft]# ll
4-rwxr-xr-x. 1 root root 95421406 May 27 11:52 apache-iotdb-1.3.1-all-bin.zip
5-rwxr-xr-x. 1 root root 107935904 May 27 11:53 jre-8u411-linux-x64.rpm
检查 JAVA 环境
安装 java:
1[root@IoTDB01 soft]# rpm -ivh jre-8u411-linux-x64.rpm
2warning: jre-8u411-linux-x64.rpm: Header V3 RSA/SHA256 Signature, key ID ad986da3: NOKEY
3Preparing... ################################# [100%]
4Updating / installing...
5 1:jre-1.8-1.8.0_411-9 ################################# [100%]
检查 java 版本:
1[root@IoTDB01 soft]# java -version
2java version "1.8.0_411"
3Java(TM) SE Runtime Environment (build 1.8.0_411-b09)
4Java HotSpot(TM) 64-Bit Server VM (build 25.411-b09, mixed mode)
查看 java 安装位置:
1[root@IoTDB01 ~]# which java
2/usr/bin/java
3[root@IoTDB01 ~]# ll /usr/bin/java
4lrwxrwxrwx. 1 root root 22 May 27 12:22 /usr/bin/java -> /etc/alternatives/java
5[root@IoTDB01 ~]# ll /etc/alternatives/java
6lrwxrwxrwx. 1 root root 40 May 27 12:22 /etc/alternatives/java -> /usr/lib/jvm/jre-1.8-oracle-x64/bin/java
配置环境变量:
1[root@IoTDB01 ~]# cat<<-\EOF>>~/.bash_profile
2export JAVA_HOME=/usr/lib/jvm/jre-1.8-oracle-x64
3EOF
4## 生效环境变量
5[root@IoTDB01 ~]# source ~/.bash_profile
6## 查看环境变量
7[root@IoTDB01 ~]# echo $JAVA_HOME
8/usr/lib/jvm/jre-1.8-oracle-x64
解压安装
这里我考虑的是可以创建一个 IoTDB 专用的用户来安装,与 root 用户保持安全隔离,但是官方文档没有提及,那就暂且不表。
1## 创建 IoTDB 安装目录
2[root@IoTDB01 ~]# mkdir /IoTDB
3[root@IoTDB01 ~]# unzip -q /soft/apache-iotdb-1.3.1-all-bin.zip -d /IoTDB/
4[root@IoTDB01 ~]# cd /IoTDB/apache-iotdb-1.3.1-all-bin/
5[root@IoTDB01 apache-iotdb-1.3.1-all-bin]# ll
6total 156
7drwxr-xr-x. 2 root root 4096 Nov 8 2023 conf
8drwxr-xr-x. 2 root root 8192 Nov 8 2023 lib
9-rw-r--r--. 1 root root 14739 Nov 8 2023 LICENSE
10drwxr-xr-x. 2 root root 259 Nov 8 2023 licenses
11-rw-r--r--. 1 root root 786 Nov 8 2023 NOTICE
12-rw-r--r--. 1 root root 19971 Nov 8 2023 README.md
13-rw-r--r--. 1 root root 16730 Nov 8 2023 README_ZH.md
14-rw-r--r--. 1 root root 77727 Nov 8 2023 RELEASE_NOTES.md
15drwxr-xr-x. 2 root root 4096 Nov 8 2023 sbin
16drwxr-xr-x. 4 root root 261 Nov 8 2023 tools
启动 IoTDB 数据库
进入 sbin 目录:
1## 一键启动 IoTDB 数据库
2[root@IoTDB01 sbin]# ./start-standalone.sh
3Execute start-standalone.sh finished, you can see more details in the logs of confignode and datanode
连接 IoTDB 数据库
1[root@IoTDB01 sbin]# ./start-cli.sh
2---------------------
3Starting IoTDB Cli
4---------------------
5 _____ _________ ______ ______
6|_ _| | _ _ ||_ _ `.|_ _ \
7 | | .--.|_/ | | \_| | | `. \ | |_) |
8 | | / .'`\ \ | | | | | | | __'.
9 _| |_| \__. | _| |_ _| |_.' /_| |__) |
10|_____|'.__.' |_____| |______.'|_______/ version 1.3.1 (Build: 214695d)
11
12
13Successfully login at 127.0.0.1:6667
14IoTDB> show timeseries
15+----------+-----+--------+--------+--------+-----------+----+----------+--------+------------------+--------+
16|Timeseries|Alias|Database|DataType|Encoding|Compression|Tags|Attributes|Deadband|DeadbandParameters|ViewType|
17+----------+-----+--------+--------+--------+-----------+----+----------+--------+------------------+--------+
18+----------+-----+--------+--------+--------+-----------+----+----------+--------+------------------+--------+
19Empty set.
20It costs 0.445s
关闭 IoTDB 数据库
1[root@IoTDB01 sbin]# ./stop-standalone.sh
2Check whether the internal_port is used..., port is 10710
3Stop ConfigNode, PID: 19825
4Check whether the rpc_port is used..., port is 6667
5Stop DataNode, PID: 19916
配置快捷命令
1[root@IoTDB01 ~]# cat <<-\EOF>> ~/.bash_profile
2export IoTDB_HOME=/IoTDB/apache-iotdb-1.3.1-all-bin
3alias IoTDB_start='$IoTDB_HOME/sbin/start-standalone.sh'
4alias IoTDB_stop='$IoTDB_HOME/sbin/stop-standalone.sh'
5alias IoTDB_cli='$IoTDB_HOME/sbin/start-cli.sh'
6EOF
7[root@IoTDB01 ~]# source ~/.bash_profile
使用快捷命令:
1[root@IoTDB01 ~]# IoTDB_start
2Execute start-standalone.sh finished, you can see more details in the logs of confignode and datanode
3[root@IoTDB01 ~]# IoTDB_cli
4---------------------
5Starting IoTDB Cli
6---------------------
7 _____ _________ ______ ______
8|_ _| | _ _ ||_ _ `.|_ _ \
9 | | .--.|_/ | | \_| | | `. \ | |_) |
10 | | / .'`\ \ | | | | | | | __'.
11 _| |_| \__. | _| |_ _| |_.' /_| |__) |
12|_____|'.__.' |_____| |______.'|_______/ version 1.3.1 (Build: 214695d)
13
14
15Successfully login at 127.0.0.1:6667
16IoTDB> exit
17[root@IoTDB01 ~]# IoTDB_stop
18Check whether the internal_port is used..., port is 10710
19Stop ConfigNode, PID: 20453
20Check whether the rpc_port is used..., port is 6667
21Stop DataNode, PID: 20586
Linux 的安装部署方式和 MacOS 有异曲同工之妙。
Docker 安装
Apache IoTDB 的 Docker 镜像已经上传至 apache/iotdb,配置项以环境变量形式添加到容器内。
获取镜像
1╭─lucifer@Lucifer-7 /Volumes/DBA/IoTDB
2╰─$ docker pull apache/iotdb:1.3.0-standalone 1 ↵
31.3.0-standalone: Pulling from apache/iotdb
4a5319f8e5f3f: Pull complete
57b69f35fd155: Pull complete
68a34aa4bb6bc: Pull complete
70831ffaa0d23: Pull complete
8b0b2a79b9345: Pull complete
9cc18aa9bc494: Pull complete
10950303a2b413: Pull complete
11d107e2d47e2e: Pull complete
124f4fb700ef54: Pull complete
13d9ef7c0512c1: Pull complete
14179442d66d38: Pull complete
1578cb2491d03b: Pull complete
16Digest: sha256:14749f800fca09c0290f61593ffeec727d54589055cbcf2005365a500aeb8051
17Status: Downloaded newer image for apache/iotdb:1.3.0-standalone
18docker.io/apache/iotdb:1.3.0-standalone
创建 docker bridge 网络
下方的网络信息根据自己的网络环境进行配置:
1╭─lucifer@Lucifer-7 /Volumes/DBA/IoTDB
2╰─$ docker network create --driver=bridge --subnet=192.168.6.0/24 --gateway=192.168.6.254 iotdb
3f0db8a34f40bb9624e3c01fc8afe8cb518dead6e8d487f87c6069b17f3639780
4╭─lucifer@Lucifer-7 /Volumes/DBA/IoTDB
5╰─$ docker network ls
6NETWORK ID NAME DRIVER SCOPE
7c81faf20cc81 bridge bridge local
849668e89d819 host host local
9f0db8a34f40b iotdb bridge local
10582cc8e5f713 none null local
创建 docker 容器
1## 注意:必须固定IP部署。IP改变会导致 confignode 启动失败
2╭─lucifer@Lucifer-7 /Volumes/DBA/IoTDB
3╰─$ docker run -d --name iotdb-service \
4 --hostname iotdb-service \
5 --network iotdb \
6 --ip 192.168.6.164 \
7 -p 6667:6667 \
8 -e cn_internal_address=iotdb-service \
9 -e cn_seed_config_node=iotdb-service:10710 \
10 -e cn_internal_port=10710 \
11 -e cn_consensus_port=10720 \
12 -e dn_rpc_address=iotdb-service \
13 -e dn_internal_address=iotdb-service \
14 -e dn_seed_config_node=iotdb-service:10710 \
15 -e dn_mpp_data_exchange_port=10740 \
16 -e dn_schema_region_consensus_port=10750 \
17 -e dn_data_region_consensus_port=10760 \
18 -e dn_rpc_port=6667 \
19 apache/iotdb:1.3.0-standalone
207c5fed890ee1376e1fc701268ffe198844fa7555e62974361c8ca429773e928b
关闭 IoTDB 数据库
1╭─lucifer@Lucifer-7 /Volumes/DBA/IoTDB
2╰─$ docker exec -ti iotdb-service /iotdb/sbin/stop-standalone.sh
3Check whether the internal_port is used..., port is 10710
4Stop ConfigNode, PID: 292
5Check whether the rpc_port is used..., port is 6667
6Stop DataNode, PID: 7
启动 IoTDB 数据库
1╭─lucifer@Lucifer-7 /Volumes/DBA/IoTDB
2╰─$ docker ps -a 130 ↵
3CONTAINER ID IMAGE COMMAND CREATED STATUS PORTS NAMES
47c5fed890ee1 apache/iotdb:1.3.0-standalone "/usr/bin/dumb-init …" 11 minutes ago Exited (130) 3 minutes ago iotdb-service
5
6## 打开容器
7╭─lucifer@Lucifer-7 /Volumes/DBA/IoTDB
8╰─$ docker start -i iotdb-service
9
10......
11
122024-05-27 05:22:17,950 [main] INFO o.a.i.db.service.DataNode:204 - Congratulation, IoTDB DataNode is set up successfully. Now, enjoy yourself!
连接 IoTDB 数据库
1╭─lucifer@Lucifer-7 /Volumes/DBA/IoTDB
2╰─$ docker exec -ti iotdb-service /iotdb/sbin/start-cli.sh -h iotdb-service
3---------------------
4Starting IoTDB Cli
5---------------------
6 _____ _________ ______ ______
7|_ _| | _ _ ||_ _ `.|_ _ \
8 | | .--.|_/ | | \_| | | `. \ | |_) |
9 | | / .'`\ \ | | | | | | | __'.
10 _| |_| \__. | _| |_ _| |_.' /_| |__) |
11|_____|'.__.' |_____| |______.'|_______/ version 1.3.0 (Build: d1326c5)
12
13
14Successfully login at iotdb-service:6667
15IoTDB> show timeseries
16+----------+-----+--------+--------+--------+-----------+----+----------+--------+------------------+--------+
17|Timeseries|Alias|Database|DataType|Encoding|Compression|Tags|Attributes|Deadband|DeadbandParameters|ViewType|
18+----------+-----+--------+--------+--------+-----------+----+----------+--------+------------------+--------+
19+----------+-----+--------+--------+--------+-----------+----+----------+--------+------------------+--------+
20Empty set.
21It costs 0.181s
也可以使用外部客户端连接:
1## <主机IP/hostname> 是物理机的真实IP或域名。如果在同一台物理机,可以是127.0.0.1。
2╭─lucifer@Lucifer-7 ~
3╰─$ IoTDB_cli -h 127.0.0.1 -p 6667
4---------------------
5Starting IoTDB Cli
6---------------------
7 _____ _________ ______ ______
8|_ _| | _ _ ||_ _ `.|_ _ \
9 | | .--.|_/ | | \_| | | `. \ | |_) |
10 | | / .'`\ \ | | | | | | | __'.
11 _| |_| \__. | _| |_ _| |_.' /_| |__) |
12|_____|'.__.' |_____| |______.'|_______/ version 1.3.0 (Build: d1326c5)
13
14
15Successfully login at 127.0.0.1:6667
16IoTDB> show timeseries
17+----------+-----+--------+--------+--------+-----------+----+----------+--------+------------------+--------+
18|Timeseries|Alias|Database|DataType|Encoding|Compression|Tags|Attributes|Deadband|DeadbandParameters|ViewType|
19+----------+-----+--------+--------+--------+-----------+----+----------+--------+------------------+--------+
20+----------+-----+--------+--------+--------+-----------+----+----------+--------+------------------+--------+
21Empty set.
22It costs 0.218s
关于单机版安装部署的使用介绍到此结束。
往期精彩文章
感谢您的阅读,这里是 Lucifer三思而后行,欢迎点赞+关注,我会持续分享数据库知识、运维技巧。